This is an old revision of the document!
Table of Contents
GUI for tele-operating an E-Maxx for Remote Surveillance using Arduino and Cocoa Development
This tutorial is designed to explain how to remotely operate an Arduino board by creating a Mac application to send commands over a UDP connection and reading and interpreting the commands on an Arduino board.
The robot in autonomous mode please note the range bars on the laptop reacting to changing readings:
http://www.youtube.com/watch?v=g_rk2V8gYbE
A short demonstration of the manual control of the vehicle:
http://www.youtube.com/watch?v=d8Dia8tVH-k
Some onboard footage:
http://www.youtube.com/watch?v=SRzndiLTKKA&feature=c4-overview&list=UURIbUxxxkCrPz6KPX_0VMqg
The Mac OSX application
In this section we will cover how to create the Mac application needed to send commands to our Arduino.
You will need:
- A 64 bit intel mac running at least OS 10.7 (lion)
- Xcode. (free software from Mac App store)
Creating the GUI
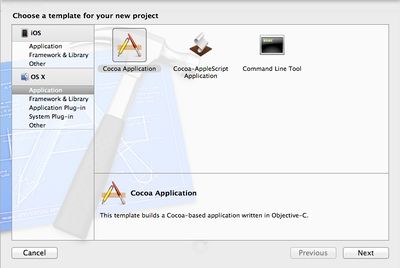
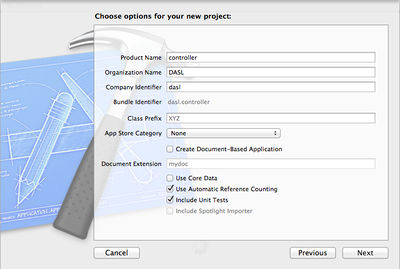
First you will need to begin by creating a new xCode Project. File→new project . Choose a cocoa application from the options presented. Then give your project a name and pick a location to save it.
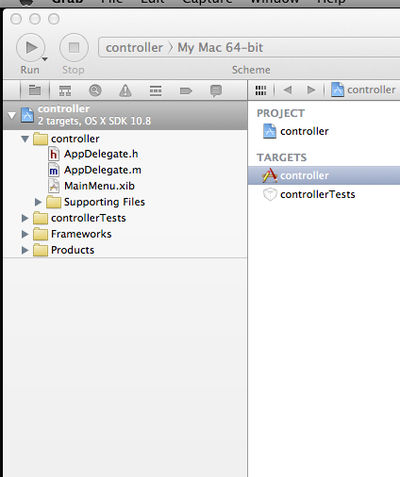
Now the main development environment should appear. On the left hand side of your screen you should see the project navigator, use it to select your MainMenu.xib file.
Once you click it xCodes interface builder will appear. In the left hand side next to the project navigator you will see a small button that looks like a OSX window. Click it to open your application's window.
Once your application's window appears you can begin to edit it. On the upper right hand side of the screen select the right most button in the view selector, this will reveal your utilities panel. In the lower half of the utilities panel you can select open up the object library.
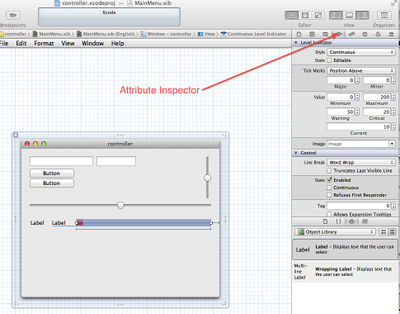
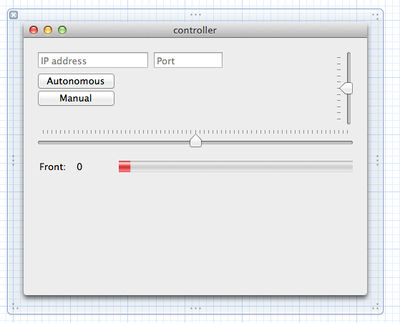
From the object library you can select all the button, sliders, text fields etc. that Apple provides in it's cocoa environment. Locate the text field, slider, level indicator, label and button and drag them into the window so it looks like the image below.
Now select your level indicator and use the Attribute inspector in the utilities panel to configure it's appearance. Since the level indicators intended use is to display ultrasonic rangefinder data make sure you set its limits to match your units and intended range. In this case from 0 to 200 cm with warnings at 20 and 50 cm
Now use the attributes inspector to configure the rest of your application to look like the image below. Set the placeholder text in the text fields to be IP address and Port, the title of the button to be autonomous and manual. Set the minimum and maximum values of your sliders to be your intended minimum and maximum steering angles (horizontal slider) and minimum and maximum power (vertical)
Now duplicate the level indicator and the two labels next to it by holding option, clicking and dragging it. This way you can preserve your formatting. You may also want to use the SIZE inspector (next to attribute inspector) to set the minimum and maximum size of your window so it can not be resized.
Linking GUI to the code
Now we need to create outlets to the objects in the .xib file so we can access the information within them.
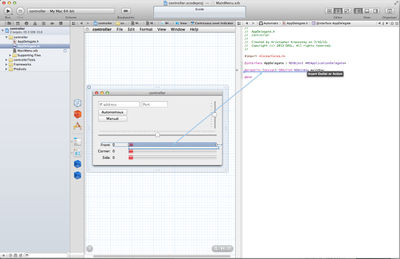
Begin by opening your app AppDelegate.h file in a secondary window by holding the option key and clicking on it. Then hold the control key, click on the Front level indicator and drag it to the header file's code just below the NSWindow property. You will then be prompted to create a connection. Create an outlet Call it rangerBar. A property field will appear in the text.
Create the following connections in this manner
@property (weak) IBOutlet NSWindow *window;
@property (weak) IBOutlet NSTextField *addrField;
@property (weak) IBOutlet NSTextField *portField;
@property (weak) IBOutlet NSSlider *steerSlider;
@property (weak) IBOutlet NSTextField *rangerVal;
@property (weak) IBOutlet NSLevelIndicatorCell *rangerBar;
@property (weak) IBOutlet NSSlider *powSlider;
@property (weak) IBOutlet NSLevelIndicator *quarterRangerBar;
@property (weak) IBOutlet NSTextField *quarterRangerVal;
@property (weak) IBOutlet NSLevelIndicator *sideRangerBar;
@property (weak) IBOutlet NSTextField *sideRangerVal;
Actions are called when we interact with objects in our GUI. We need some of them too. You can create them in the same way, just make sure you select action instead of outlet
- (IBAction)setSteer:(id)sender;
- (IBAction)setPow:(id)sender;
- (IBAction)setAuto:(id)sender;
- (IBAction)setManual:(id)sender;
If you ever want to manually inspect your connections you can do so using the connection inspector in the utilities panel.
Finally we need to prepare our AppDelagate.cpp file. In order to generate the getter and setter methods for your properties you need to @synthesize them. So in AppDelage.cpp synthesize the following.
@synthesize addrField;
@synthesize portField;
@synthesize steerSlider;
@synthesize rangerVal;
@synthesize rangerBar;
@synthesize powSlider;
@synthesize quarterRangerBar;
@synthesize quarterRangerVal;
@synthesize sideRangerBar;
@synthesize sideRangerVal;
Now your GUI is complete and linked to your code.
Coding the application
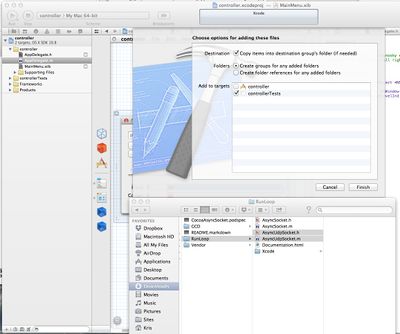
This application relies on the Async UDP library. If you haven't downloaded it already do so now. import the library by selecting the AsyncUdpSocket.h and AsyncUdpSocket.m and dragging them to your project navigator in the same directory as your AppDelegate files. Make sure copy files is checked.
Make sure your library is linked otherwise it will not compile later. Click your project in the navigator then select build phases and check compile sources.
Now import the UDP socket library in your header file and create an instance of it. in the @interface. While you are at it add a long int called tag to keep track of which UDP message we are on. While you are at it include It should look like this.
AppDelegate.h:
  #import <Cocoa/Cocoa.h>
  #import "AsyncUdpSocket.h"
  @interface AppDelegate : NSObject <NSApplicationDelegate>{
     long tag;
     AsyncUdpSocket *udpSocket;
  }
Now the udp socket must be initialized. To do this you must override the cocoa method.
(void)applicationDidFinishLaunching:(NSNotification *)aNotification
This method is called whenever the application is done launching. So we want to over ride that in the app delegate
AppDelegate.m:
 //
 //  AppDelegate.m
 //  Navsea Controller
 //
 //  Created by Kristopher Krasnosky on 7/12/13.
 //  Copyright (c) 2013 Faraway5. All rights reserved.
 //
 #import "AppDelegate.h"
 @implementation AppDelegate
 @synthesize  addrField;
 @synthesize  portField;
 @synthesize steerSlider;
 @synthesize rangerVal;
 @synthesize rangerBar;
 @synthesize powSlider;
 @synthesize quarterRangerBar;
 @synthesize quarterRangerVal;
 @synthesize sideRangerBar;
 @synthesize sideRangerVal;

(void)applicationDidFinishLaunching:(NSNotification *)aNotification{
  	  udpSocket = [[AsyncUdpSocket alloc] initWithDelegate:self];   // allocate memory for the socket and initialize it
  	  NSError *error = nil;   // create an NSError object and initialize it to nil
if (![udpSocket bindToPort:0 error:&error]) check to make sure binding was successful { NSLog(@“Error binding: %@”, error); if not send the error to the log
  		return;
  	}
  	[udpSocket receiveWithTimeout:-1 tag:0];

  	NSLog(@"Ready");

   }
Now a method (function) must be created to send data over UDP so we need to insert
(void)send: (NSString*)msg;
into AppDelegate.h:
//
//  AppDelegate.h
//  Navsea Controller
//
//  Created by Kristopher Krasnosky on 7/12/13.
//  Copyright (c) 2013 Faraway5. All rights reserved.
//

#import <Cocoa/Cocoa.h>
#import "AsyncUdpSocket.h"

@interface AppDelegate : NSObject <NSApplicationDelegate>{
    long tag;
    AsyncUdpSocket *udpSocket;
}
@property (weak) IBOutlet NSWindow *window;
@property (weak) IBOutlet NSTextField *addrField;
@property (weak) IBOutlet NSTextField *portField;
@property (weak) IBOutlet NSSlider *steerSlider;
@property (weak) IBOutlet NSTextField *rangerVal;
@property (weak) IBOutlet NSLevelIndicatorCell *rangerBar;
@property (weak) IBOutlet NSSlider *powSlider;
@property (weak) IBOutlet NSLevelIndicator *quarterRangerBar;
@property (weak) IBOutlet NSTextField *quarterRangerVal;
@property (weak) IBOutlet NSLevelIndicator *sideRangerBar;
@property (weak) IBOutlet NSTextField *sideRangerVal;


- (IBAction)setSteer:(id)sender;
- (IBAction)setPow:(id)sender;
- (IBAction)setAuto:(id)sender;
- (IBAction)setManual:(id)sender;
- (void)send: (NSString*)msg;         // method used to send data to arduino


@end
Note: Now our Header file is complete!
The send method must now be created in the AppDelegate.m. Syntax Note: For those that have a background in Cpp the format “class value” is similar to “class.value” in Cpp similarly “class method:myInt withString:myString” is similar to “class.method( myInt , myString )”
AppDelegate.m:
(void)send:(NSString *)msg{

    NSString *host = [addrField stringValue];   // get the value from IP address field
	if ([host length] == 0)                              // if it is empty don't try to send the message and log an error
	{
		NSLog( @"Address required");
		return;
	}

	int port = [portField intValue];                 // Check the port  in the same way as the IP address
	if (port <= 0 || port > 65535)
	{
		NSLog(@"Valid port required");
		return;
	}


	NSData *data = [msg dataUsingEncoding:NSUTF8StringEncoding];      // if it all checks out convert the string to NSData and send it
	[udpSocket sendData:data toHost:host port:port withTimeout:-1 tag:tag];


	tag++;   // increase the tag
}
Now That our send method is complete we can use it to make our Actions for our UI Objects. All string sent to and fromt he adruino are in the format “command:1234” string:int so we need to format the string to send in that way before we send it so the Arduino code can recognize it.
AppDelegate.m
(IBAction)setSteer:(id)sender {
    // all string sent to and fromt he adruino are in the format "command:1234"  string:int

    //              [class    method:          @"string:%@,[the value from the slider]]    NOTE:  %@ means insert string after comma here
    NSString *msg = [NSString stringWithFormat:@"steer:%@",[steerSlider stringValue]];   // create a string to send and format it.

    [self send:msg];   // send the message
    NSLog(@"updated slider position %@",[steerSlider stringValue]);   // log what we did
    return;
}

(IBAction)setPow:(id)sender {
    NSString *msg = [NSString stringWithFormat:@"pow:%@",[powSlider stringValue]];
    [self send:msg];
    NSLog(@"updated powSlider position %@",[powSlider stringValue]);
    return;

}

(IBAction)setAuto:(id)sender {
    NSString *msg = [NSString stringWithFormat:@"auto:0"];
    [self send:msg];
    msg = [NSString stringWithFormat:@":0"];   // this message will clear the buffer in the arduino
    [self send:msg];
    NSLog(@"auto mode sent");
    return;

}

(IBAction)setManual:(id)sender {
    NSString *msg = [NSString stringWithFormat:@"manu:0"];
    [self send:msg];
    msg = [NSString stringWithFormat:@":0"]; // this message will clear the buffer in the arduino
    [self send:msg];
    NSLog(@"manual mode sent");


    // the methods below initialize the power settings and the steering settings on the arduino to the
    // ones that are set currently on the sliders
    msg = [NSString stringWithFormat:@"steer:%@",[steerSlider stringValue]];
    [self send:msg];
    NSLog(@"updated slider position %@",[steerSlider stringValue]);


    msg = [NSString stringWithFormat:@"pow:%@",[powSlider stringValue]];
    [self send:msg];
    NSLog(@"updated powSlider position %@",[powSlider stringValue]);


    return;
}
Finally we must listen for incoming UDP messages and act accordingly. The asyncUDPSocket library provides us with methods to over ride to do just that.
(BOOL)onUdpSocket:(AsyncUdpSocket *)sock
     didReceiveData:(NSData *)data
            withTag:(long)tag
           fromHost:(NSString *)host
               port:(UInt16)port
In AppDelegate.m:
(BOOL)onUdpSocket:(AsyncUdpSocket *)sock
     didReceiveData:(NSData *)data
            withTag:(long)tag
           fromHost:(NSString *)host
               port:(UInt16)port
{
	NSString *msg = [[NSString alloc] initWithData:data encoding:NSUTF8StringEncoding];
	if (msg){
        NSLog(@"Message Recieved: %@",msg);
    }
    if ([msg rangeOfString:@"fRange:"].location != NSNotFound){   // if the message rRange: is found

        // get find the find the number after the fRange: command
        NSRange range = [msg rangeOfString:@"fRange:"];
        NSString *substring = [[msg substringFromIndex:NSMaxRange(range)] stringByTrimmingCharactersInSet:[NSCharacterSet whitespaceCharacterSet]];


        NSLog(@"%@",substring);// log the substring to make sure it is parsing corretly


        [rangerVal setStringValue:substring];   //  set the rangerVal  (the label) to the string

        [rangerBar setFloatValue:[substring floatValue]];   // set the rangerBar value Note we had to get the substring's float value to send to
        // the set float value method
    }

    if ([msg rangeOfString:@"qRange:"].location != NSNotFound){
        NSRange range = [msg rangeOfString:@"qRange:"];
        NSString *substring = [[msg substringFromIndex:NSMaxRange(range)] stringByTrimmingCharactersInSet:[NSCharacterSet whitespaceCharacterSet]];
        NSLog(@"%@",substring);
        [quarterRangerVal setStringValue:substring];

        [quarterRangerBar setFloatValue:[substring floatValue]];
    }

    if ([msg rangeOfString:@"sRange:"].location != NSNotFound){
        NSRange range = [msg rangeOfString:@"sRange:"];
        NSString *substring = [[msg substringFromIndex:NSMaxRange(range)] stringByTrimmingCharactersInSet:[NSCharacterSet whitespaceCharacterSet]];
        NSLog(@"%@",substring);
        [sideRangerVal setStringValue:substring];

        [sideRangerBar setFloatValue:[substring floatValue]];
    }


	[udpSocket receiveWithTimeout:-1 tag:0];
	return YES;
}
Now you are ready to compile and run your application and correct any syntax errors you may have. I have included the final version of the xCode project here to cross check.
Arduino code
To simplify the transfer of information to and form the Arduino over UDP a controller class was used. Below is a sample INO file that that sends and receives commands over UDP using the eCont class I created. To send a message simply use the sendCmd(command,value) function. Remember for this project commands are in the format “command:123” and should be created and parsed accordingly.
To receive messages simply use the getCmd() and getVal functions. They will return the command cast as a string and the value cast as an integer respectively.
#include "eCont.h"
#include <SPI.h>         // needed for Arduino versions later than 0018
#include <Ethernet.h>
#include <EthernetUdp.h>         // UDP library from: [email protected] 12/30/2008

eCont myCon;

void setup(){
  myCon.init();
  Serial.begin(9600);
}

void loop(){
  myCon.updateBuffer();
  Serial.println(myCon.getBuffer());
  myCon.sendCmd("hello:",333414);
  Serial.println(myCon.getCmd());
  Serial.println(myCon.getVal());
  delay(10);
}
The actual class is included below with ample comments
eCont.h
//  eCont.h
//  eCont is a class to easily recieve and parse commands sent from the corresponding Cocoa Applicaiton
//  Created by Kristopher Krasnosky on 7/13/13.
//  Copyright (c) 2013 Faraway5. All rights reserved.

#ifndef car_h
#define car_h

#include <SPI.h>         // needed for Arduino versions later than 0018
#include <Ethernet.h>
#include <EthernetUdp.h>         // UDP library from: [email protected] 12/30/2008

class eCont{
  public:
  eCont();  // constructor  not used at this point
  void init();  // initialize the
  void updateBuffer();  // update the internal buffer
  String getBuffer();   // return the buffer as a string
  String getCmd();    // return the recieved command as a string
  long getVal();    // return the value of the command as a long int
  void sendCmd(String cmd, long val);   // format a command and send it over UDP

  private:

  // data storage
  char packetBuffer[UDP_TX_PACKET_MAX_SIZE]; //buffer to hold incoming packet,
  unsigned int localPort;
  EthernetUDP Udp;

  // functions
  int extract(char *input, int from, int length);  // convert a section of a string to an int
  // usefull for converting command values to ints that can be used

};


#endif
eCont.cpp
//  eCont.cpp
//  Created by Kristopher Krasnosky on 7/13/13.
//  Copyright (c) 2013 Faraway5. All rights reserved.

#include "eCont.h"

#include <SPI.h>         // needed for Arduino versions later than 0018
#include <Ethernet.h>
#include <EthernetUdp.h>         // UDP library from: [email protected] 12/30/2008


eCont:: eCont(){

}

void eCont:: init(){
byte mac[] = {
  0x90, 0xA2, 0xDA, 0x0D, 0xC8, 0x06 };  // set the mac address.  be sure you set it to your board
  IPAddress ip(192, 168, 0, 2);    // set a compatable ip address for your network
  unsigned int localPort = 8888;    // set a port to communicate over
  Ethernet.begin(mac,ip);      // begin the ethernet
  Udp.begin(localPort);      // begin the UDP
}

 void eCont::updateBuffer(){
  int packetSize = Udp.parsePacket();  //  get the packet from the UDP and and store the size
  if(packetSize){   // check to make sure the packet is non zero
     Udp.read(packetBuffer,UDP_TX_PACKET_MAX_SIZE);   // read the packet and store to packet buffer.  Note packet buffer is
                                                      // a reference parameter so it will be re-writen here.
    Serial.println("Contents:");  // print packet buffer for debuging
    Serial.println(packetBuffer);
  }
}

String eCont::getBuffer(){
  String val=packetBuffer;    // simply return the buffer
  return val;
}

String eCont::getCmd(){
  String temp=packetBuffer;    // Cast packetbuffer as a string called temp
  return temp.substring(0,temp.indexOf(":"));    // search for the colon and return text up to that point
}
long eCont::getVal(){
  String temp=packetBuffer;   // Cast packetbuffer as a string called temp
  return extract(packetBuffer, temp.indexOf(":")+1,temp.length());  //  extract the interger from the just after the colon to the end of the string.
}


void eCont::sendCmd(String cmd, long val){
    char charBuf[50];      // create a character buffer you may need a larger one depending on the size of your packets
    String s=cmd+String(val);    //append the long int to the string
    s.toCharArray(charBuf, 50);  //  convert the string s to a character array so we can send it over the udp
    Udp.beginPacket(Udp.remoteIP(), Udp.remotePort()); // begin your packet on on the remote ip and port
    Udp.write(charBuf);    // send the character buffer
    Udp.endPacket();    // end the packet and send
}

/**
 **    Private Functions
 **/


int eCont::extract(char *input, int from, int length){
  char temp[length+1];  // create a temporary character buffer
  strncpy(temp, input+from, length);   //  create an arrary of characters
  return atoi(temp);  //  return an interger
}
The class can be downloaded with the following link: controller.zip
Controlling the Emaxx
to control the emaxx I use the previously developed car.h library. It included classes to operate as steering control, sonic rangefinder, motor controller, encoders for velocity control, a sweeping scanner and a gyro. In addition it has a class to control the autonomous modes. The modes class was modified in the following way to allow for manual control.
the ping code was modified to send the value from the sonic rangefinder to the controller GUI
void modes::getPings(){
  lastPing=sideRanger.pingCM();
  myCon.sendCmd("sRange:",lastPing);   // you can see the command being sent here
  lastPingFront=frontRanger.pingCM();
  myCon.sendCmd("fRange:",lastPingFront);
  lastPingQuarter=quarterRanger.pingCM();
  myCon.sendCmd("qRange:",lastPingQuarter);
  /*
  //Serial.print("side: ");
   //Serial.print(lastPing);
   //Serial.print(" front: ");
   //Serial.print(lastPingFront);
   //Serial.print(" quarter: ");
   //Serial.println(lastPingQuarter);
   */
}
This function is called in every every mode for every loop iteration so it is a good place to interpret commands
void modes::allModesActions(){
  myCon.updateBuffer();
  Serial.println(myCon.getBuffer());
  lastCmd=myCon.getCmd();
  lastVal=myCon.getVal();
  Serial.println(lastCmd);  // debug
  Serial.println(myCon.getVal());
  if(lastCmd=="steer"){  // if the command was to steer...
    Serial.println("steering");
    mySteer.setPos(lastVal);   // set the steering to the last value
    delay(100);
  }
  if(lastCmd=="pow"){
    Serial.println("power");
    speedcont.setPower(lastVal);
    delay(100);
  }
  if(lastCmd=="manu"){   // this switches us to manual control
    Serial.println("manual selected");
    manual();  // the manual mode
  }
  if(lastCmd=="auto"){   // this switches us to autonomous mode
    Serial.println("Automatic selected");
    wallFollow();   // the autonomous mode
  }
}

