
Table of Contents
Install Ubuntu and Xenomai
Author: Yu Hang He
Email: hey6@unlv.nevada.edu
Date: Last modified on <07/25/18>
Keywords: Hubo 2, Ubuntu, Choreonoid, Simulator

The photo above depicts Choreonoid. Choreonoid is an open-source integrated GUI software for robots. It is being developed by Shin’ichiro Nakaoka et al of the National Institute of Advanced Industrial Science and Technology (AIST) in Japan. By default, the tool includes a choreography function and a dynamics simulator. Other functionality can be added, as the tool also functions as a framework for developing GUI applications for robots.
Motivation and Audience
The tutorial serves as an tutorial for installing Choreonoid and use it to simulate Hubo 2. Readers of this tutorial assumes the reader has the following background and interests:
* Know how to use Linux System
* Interested in learning how to use dynamic simulator
* Interested in learning how to simulate Hubo 2
* Interested in installing and using QT
The rest of this tutorial is presented as follows:
Install QT
The software on Hubo 2 and DRC-Hubo are developed through QT. Therefore, it is necessary to install QT on Linux first.
- Download QT verson 5.7.0 from the website
- Open terminal and change directory to where the downloaded file is located and then run:
sudo chmod 777 qt-opensource-linux-x64-5.7.0.runsudo ./qt-opensource-linux-x64-5.7.0.run
- During the installation wizard, check that QT will be installed in the
/optdirectory and check all the installation items.
- For QT program to work with Xenomai. Xenomai debug.h file need to be modified. Run:
sudo nautilus
- Go to the
computer/usr/include/xenomai/copperplate/folder and open the debug.h file. - Comment out the two #define debug lines.


Install Choreonoid
The necessary files for running Hubo 2 simulation in Choreonoid can be found in the Hubo2/Choreonoid Install File folder in the Github repository. Contact me for access to the Github files.
It is recommended to use Choreonoid version 1.5 which can be downloaded through Choreonoid's official site. The latest version may not be compatible with current codes.
- Download the compressed file from download page and extract the file into the home directory.
- rename the folder to
choreonoid.
- Open a terminal and enter the following commands:
cd ~/choreonoid/misc/script./install-requisites-ubuntu-16.04.shcmake ~/choreonoidccmake ~/choreonoid
- The “ccmake” executable is the CMake curses interface. Project configuration settings may be specified interactively through this GUI.
- Use the keyboard arrow key to scroll down the list to find
BUILD_ODE_PLUGIN. - Press the
[Enter]key to switch the configuration to on. - Press
[c]to configure the setting and then[g]to generate the setting file and save. Finally, press[e]to exit.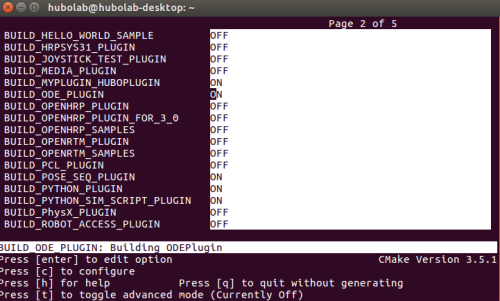
- In the terminal enter:
sudo make install
- After the installation is complete, paste the
OKKEEfolder from Github into the~choreonoid/folder - Paste
HUBOPLUGINfrom Github into the~choreonoid/samplefolder. Alternatively, use the following commands while terminal is in the directory withOKKEEandHUBOPLUGINfolders.cp –R OKKEE ~/choreonoidcp –R HUBOPLUGIN ~/Choreonoid/sample
- Go to ~chorenoid/sample/HUBOPLUGIN folder and edit HuboPlugin.cpp
- On line 14 edit the include header to the location of Hubo's codes


- Enter the following commands to install Choreonoid with Hubo Plugin
cd ~/choreonoidcmake .sudo make install
Hubo 2 WALKREADY Demo
Hubo 2 WalkReady Demo
This part of tutorial will guide readers through the process for running the Daemon, PODOGUI, and WalkReady AL for Hubo 2 in Choreonoid.
For Daemon to work properly with Choreonoid, some parts of the code must be changed. A modified version of Daemon that works with Choreonoid is already included with Github source code inside podo_hubo_lower_tele folder.
Use the QT Creator to build and run the programs. Then, load the Hubo 2 model and run simulator on Choreonoid.
- Open the QT Creator through search window.
- Go to File → Session Manager and create a new session. The name does not matter.
- Click on the new session that was created to move to Edit tab.

- Right click within project tab → Load Project or [Ctrl + Shift + O].
- Navigate to the podo_hubo_lower_tele folder → src → _Daemon_Chorenoid and open Daemon_Choreonoid.pro.

- Repeat the same process and open PODOGUI.pro,ALPrograms.pro and PODOLauncher.pro.

- Editing following files in PODPLauncher.pro
- Qlockfile.h
- Replace
include “../../src/corelib/io/qlockfile.h“, withinclude “/opt/Qt5.7.0/5.7/Src/qtbase/corelib/io/qlockfile.h”.
- main.cpp
- Replace
include “../../src/_PODOLauncher/qlockfile.h“withinclude <qlockfile.h>.
- ui_launcherDialog.h:
- Replace
QtGuiin the file withQtWidgets. - Remove all instances of
QCoreApplication::UnicodeUTF8.
- On the bottom left of QT Creator, make sure each program is configured for Release on build.

- Click on the Project tab to configure build options.

- Edit the build directory for each program.
- For ALPrograms:
../../build/ALBuild
- For Daemon_Choreonoid:
../../build/_DaemonChoreonoidBuild
- For PODOGUI:
../../build/PODOGUIBuild
- For PODOLauncher:
../../build/PODOLauncherBuild
- For Daemon_Chorenoid, navigate to Run configuration and check
Run in terminaloption.
- On the top option toolbar, click on Build → Clean All then Build → Build All. If
rederror messages did not appear that means the build was successful.
- Open a terminal and enter the following command to start Choreonoid:
choreonoid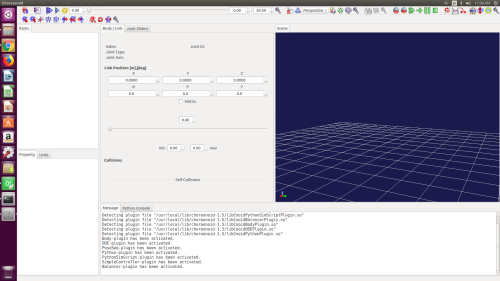
- On the top toolbar, click File → Open Project and navigate to the OKKEE folder.

- Select
test_original_1to open the Hubo 2 model and simulator.
- Go back to QT Creator. Right click on Daemon_Choreonoid in the project tree and select
Run. A terminal should open, running the Daemon_Choreonoid program.
- Right click on PODOGUI and click
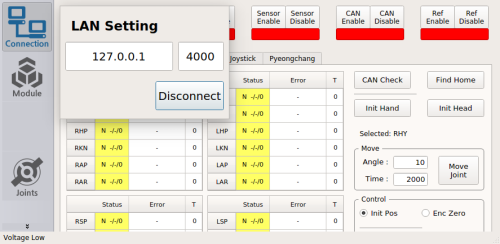
Run. The PODOGUI should open.
- Click on Connection in PODOGUI and click on Connect.
- Click on Module, choose WalkReady AL and click
Open Process. If light turned green that means WalkReady AL was successfully opened.
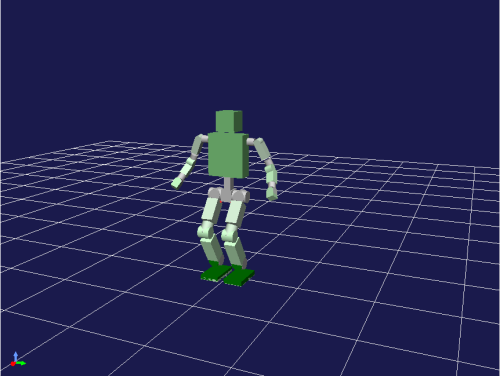
- Go back to Choreonoid window, click on
Start Simulation from the Beginningbutton on top of Scene view to start simulation. Hubo 2 should start moving toward default position. - In PODOGUI, navigate to Walking tab and click on
Walk Ready Pos. Hubo 2 should move toward Walk Ready Position in Choreonoid as well.


Final Words
The purpose of this tutorial was to guide reader through the process of installing QT and Choreonoid simulator in preparation for working with Hubo 2.
For questions and comments, email hey6@unlv.nevada.edu